IoT Hacking, Momentum Axel 720P
I am nearing completion of my B.S. in IT Security at WGU, and two of my final courses involve a research paper and capstone project. I had lots of ideas, but narrowed it down to

Intro
I am nearing completion of my B.S. in IT Security at WGU, and two of my final courses involve a research paper and capstone project. I had lots of ideas, but narrowed it down to these 3:
- Write a security related program, patch, or exploit
- Work on a bug bounty on Synack or HackerOne
- Pentest an IoT device
In the end, I actually chose to do a web pen test because it met the requirements of the project better, but decided to pentest an IoT device in my free time as well. It’s something that I’ve spent a lot of time studying, especially since the Mirai botnet. I’ve attended several talks at hacker conferences on IoT hacking. Just how insecure are most of these devices? Almost all of them are horribly insecure, from what the security community is telling us.
But would I be able to pwn one for myself? I have limited experience in hardware hacking, reverse engineering binaries, or buffer overflow exploits, three important IoT hacking skills. But I have no problem manipulating API requests, scanning, and inspecting network traffic.
Choosing an IoT device to hack
I set out to find an IoT device, and my journey began at Walmart. I didn’t go straight to the electronics section, I actually walked up and down many other aisles looking for household items that had a “Wi-Fi” sticker on them. I found lots of bluetooth devices - blood pressure pumps, a pregnancy test, a scale. But I decided against hacking bluetooth, because it is unlikely to be remotely exploitable and therefore I felt that any hack discovered would have less of an impact.
I wanted to have the potential to find a vulnerability with a big impact
So I was looking for Wi-Fi devices instead. But not just any Wi-Fi device, I wanted one that connected to “the cloud” and could take commands remotely. In particular, I was hoping to find a device that would use UPnP to forward a port to itself. If I found a vulnerability on that port, the impact could be that thousands of devices could be taken over remotely, just like the type of device the Mirai botnet searches for to add to its zombie army.
I ended up choosing this Momentum IP Camera.
I didn’t choose Nest or one of the other established brands, because I know they have been under scrutiny and are starting to care more about security. I chose this camera because it was cheap, only $40, and the company looked small based on a quick Google search. I also searched for ‘Momentum+hacked’ and ‘Momentum+cve’ but found nothing, a sign that no one has tried hacking it yet. Another bonus? It comes with an app for remote control, so there is a possibilty for a remote hack, and that potential “big impact” that I was looking for.
Passive Recon
Passive recon involves researching the target without actually engaging it.
Before I even got the camera out of the box, I began researching the company that makes it, Momentum. I want to know if they are a big company, if they have a security engineer or team, how long have they been developing cameras, what other products do they make, how many developers they have. Are they outsourcing the development work, or doing it in house?
First impression is that the company’s website is nice and modern, and I assume they are a big company based on that and the fact that their product is in Walmart and Target. In the footer there is a reference to what I assume is their parent company, Apollo Tech USA, but a quick Google search for it turns up nothing.
I run a whois search to find out how old the domain is, this might give me an idea of the age of the company.
Created Date: 2014-04-11
Four years old, so a pretty new company, or at least a new brand. Next I check the Internet Archive to get a look at older versions of the website. The oldest snapshot is from November 2015.
That snapshot contains an address “8608 Utica Ave #220 Rancho Cucamonga, CA 91730”. I Google that address and it leads to this FCC application https://fccid.io/2AML4. I notice the contact email ‘buweiliang@hikvision.com’. Hikvision? Maybe Momentum is a shell brand of Hikvision?
Next I try to find Momentum employees on LinkedIn. I am looking for CEO, CTO, developers or security engineers. But I actually couldn’t find a single employee. So Momentum is probably a Hikvision brand?
I search Google with ‘site:momentumcam.com’ to see if I find anything interesting that I haven’t already seen. I see they are using WordPress. I click through a few more results, and see ‘Order #2090837’, what’s that? For some reason their Wordpress cart plugin is posting all of their order numbers to public pages? https://www.momentumcam.com/samcart_order/
Click back and you can see the first order was placed in June 2017, about 50 orders or so total so far. Interesting. You might also notice that the orders are all being placed by “Olibro Design”, probably the WordPress admin username. That reveals the web designer: https://www.olibro.com/about-us/
The next thing I turn my attention to is the ‘My Account’ page. The first thing I notice is the domain name change from momentumcam.com to momentum-cam.com, a confusing choice (why not just account.momentumcam.com?). A whois on momentum-cam.com shows:
Created Date: 2016-10-28
I also notice under the Momentum logo it reads “powered by pepper”. So naturally I wonder, who or what is “pepper”? A Google search for Pepper IoT gives some more information. http://pepper.me/
Pepper is a Kansas based ventured backed IoT development company that closed $8.5M of Series B funding in March of 2017. Their most recent Twitter post was in August 2017.
I’m assuming pepper developed the “cloud” backend.
This product looks like it will be a great choice for some security research.
Active Recon
Active recon is to engage the target in order to obtain more information about it.
I started by simply taking the camera out of the box, setting it up, and connecting my iPhone app to it. Without analyzing any attack surface, I was learning how it is used in the way it is intended to be used and what kind of features it has. Here is what I learned:
- It has Android and iPhone apps
- The apps can control the camera’s microphone, speaker, and view the video feed
- The apps can set motion detection
- There is a cloud based web interface, but only used for billing - no features
- There is a cloud subscription service for video storage
Next I port scanned it with Nmap, as seen in the blog post image, and learned that it has 3 open ports - 80, 554, and 8000.
The first thing I tried is opening port 80 and 8000 in my web browser, but was disappointed to see Chrome give an error message - connection reset. There seemed to be no way to view any type of web interface that this might have.
After that, I took a look at the RTSP port, 554. I read this guide on how to connect to the RTSP stream using VLC Media Player. But upon connecting I was stumped once again, the RTSP stream required a username and password for authentication.
Next, I tried using Wireshark to examine the network traffic to and from the device. I setup my switch to mirror all traffic from my wireless access point to my desktop, and filtered the results to see only the traffic of the camera. However, all of the traffic was encrypted using HTTPS, and I was not able to read the requests. I could only see where the traffic was coming and going to, which was a few different momentum-cam.com servers on AWS.
Not so easy to hack after all, I was bummed that this camera might be tougher to hack than I had anticipated. I seemed to be at a dead end, with no attack surface left. I could try fuzzing random stuff at the HTTP ports? I didn’t know what to try next. So I began reading about other IoT hacks and came across some tutorials on UART and JTAG, serial connections to the device board itself.
Getting Root
I quickly hit a dead-end after my port scan came back with 3 ports, 2 giving resets to my HTTP requests, and 1 RTSP port requiring authentication. Also, all network traffic to and from the device and cloud servers was encrypted over HTTPS. After researching what else I could try, I came across UART and JTAG connections to the device board itself. Opening up the camera, I quickly was able to identify a UART port.
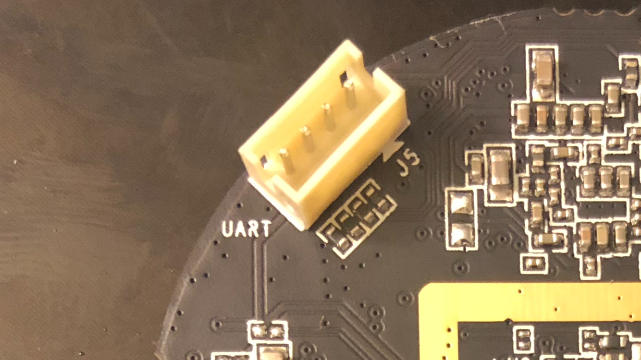
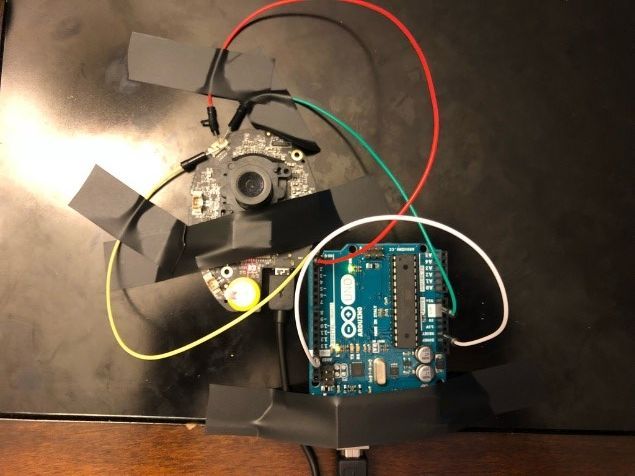
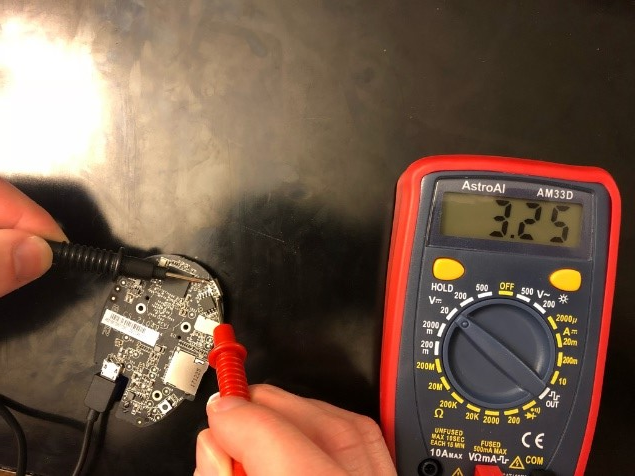
UART consists of 4 pins - Voltage, RX, TX, and Ground. I used a multimeter and connected to the ground and voltage pins, and found 3.3V. A UART to USB cable is required to interact with the serial connection to the board, and can be purchased for less than $10 on Amazon, but I used an Arduino instead because I already had one.
To connect the Arduino to the camera’s UART:
- Connect wire from Arduino Ground to Arduino Reset pin
- Connect wire from Arduino RX to camera TX
- Connect wire from Arduino TX to camera RX
- Arduino Ground to camera Ground

I could not find a UART pin connection that fit the size required, so instead I broke the plastic surrounding the pins and bent them different directions, then taped wires in place. A very precarious solution, but was perfectly fine and reliable (as long as it is not bumped into of course).
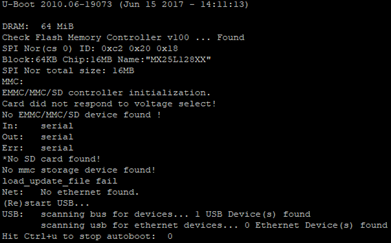
Next, I used Putty to connect to the Arduino COM port, but I did not know which baud rate to use. I tried 9600, one of the most common, but saw garbled output in the window. I looked up ‘common baud rates’ and began trying all of them, one at a time. I eventually discovered that the camera’s UART port baud rate was 115200.
After using the correct baud rate, I was finally able to see the output from the camera and interact with it. To my surprise, after the camera finished booting, I was given an interactive root shell through the console.
I began exploring all of the internals of the device, jumping around the directories, reading the config files, and searching for clues about how it works. For more information about what I found, checkout my penetration test report which I sent to the vendor.
Custom Firmware
One of the first things I wanted to do after getting root login through the console, was to enable network access over telnet or SSH. I found out that I could enable telnet using Busybox command - ‘/bin/busybox telnetd’. This allowed me to login to the camera using Putty over telnet, that way I could ditch the console connection. But I found that if the camera rebooted, its configuration was restored to default and telnet went away.
I tried to figure out why that was happening, and after some research I found out that it was common for IoT devices to compress their configurations to save space in storage, uncompressing and overwriting the old configuration upon each reboot. In order to get telnet to ‘stick’ I was going to have to figure out how to modify the firmware, and load my customized firmware onto the camera.
I discovered two methods to load the firmware, which I wrote about in the penetration test report.
Although I was able to load my own custom firmware, I still haven’t got it working yet. The firmware was easy to extract and modify using binwalk for example, but putting the firmware back together after modification seems to be the problem. When the device reboots with the new firmware, it is not able to mount it.
There is a community of IP camera firmware hackers who have been helpful in trying to help me get it working, and we are still trying to figure it out.
https://ipcamtalk.com/threads/custom-initrun-sh-firmware-tools-not-working.28054/#post-266717
Penetration Test Report
I created a report of my findings and submitted it the vendor:
https://rchase.com/downloads/momentum-iot-penetration-test-report.pdf