Implementing Tailscale at HostiFi


It's been a year and a half since my last blog post, $374K ARR. I've been keeping busy again! A lot has happened since then. I won't go into all the details, but I want to fix this gap in the blog post timeline with a short update for context before going deep on our Tailscale implementation.
HostiFi has grown to $1.1M ARR, and it all pretty much came together just how I hoped it would.
I took a full month off this year to go on a road trip from Michigan to California and back with my fiancee and the business not only ran smoothly but MRR grew 8% while I was away, all thanks to our team and processes.
I ended up building out the org chart just like I wanted to. I hired a full-time Laravel developer, a full-time sales person, and two additional full-time support engineers.
We finally launched the new website after 2 years and three rewrites.
To my amazement, we did end up getting to a million ARR with just the two products still - UniFi and UISP cloud hosting.
We're only one developer short of the "dream team" I described in my last blog post. I just need a Senior Python Developer now. If you're reading this and interested, DM me on Twitter for more info!
Tailscale use case for HostiFi
At HostiFi, our remote support team of 5 is managing over 2,000 VPS instances on Vultr for our customers. Currently our team provides support by logging into the servers over SSH. Port 22 is open to the internet from all servers, secured by key based authentication and Duo MFA.
Custom firewalls on each server, but with whitelisted IPs for support access
We're working on building a new feature for customers to manage their own firewall rules though. They'll soon be able to whitelist which IP addresses can connect to port 22 for example, from their dashboard at app.hostifi.com. But this would create a challenge for our team to be able to provide support if they can't connect to the server via SSH due to the firewall rules. This is what prompted me to look for a solution like Tailscale.
Too many support IPs to keep track of
A possible solution would be to whitelist each support employee's IP address on each customer's firewall in addition to their custom rules, but that would be tedious to manage as our home IP addresses change and new hires are onboarded.
A shared VPN server can consolidate the IPs we're coming from
By using a traditional VPN solution, we could make this problem easier to manage. All of our employees could connect through a VPN server and then we would only need to whitelist that one IP address across all of our customer firewalls.
Even then, it's not quite that simple though. With a remote team based in USA, UK, and India, and customer servers located in datacenters around the world, the latency that can occur by connecting through a far away VPN server could cause problems for the support engineer working on the servers.
Here's what it would look like if a support engineer in Mumbai connected to a VPN server in New Jersey to then access a customer VPS in Stockholm.
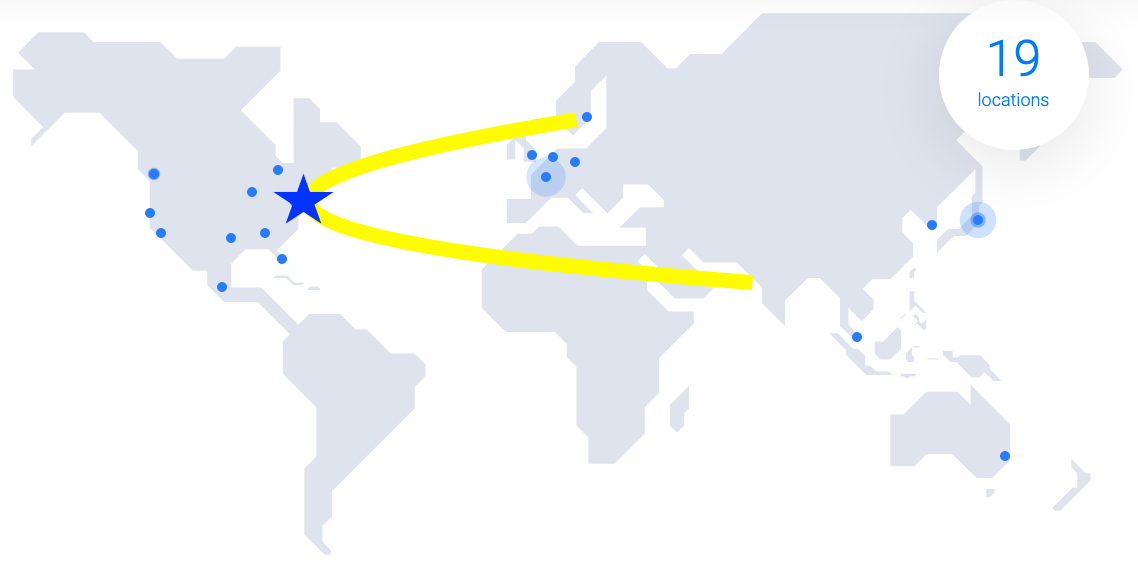
Ping on that connection would be bad!
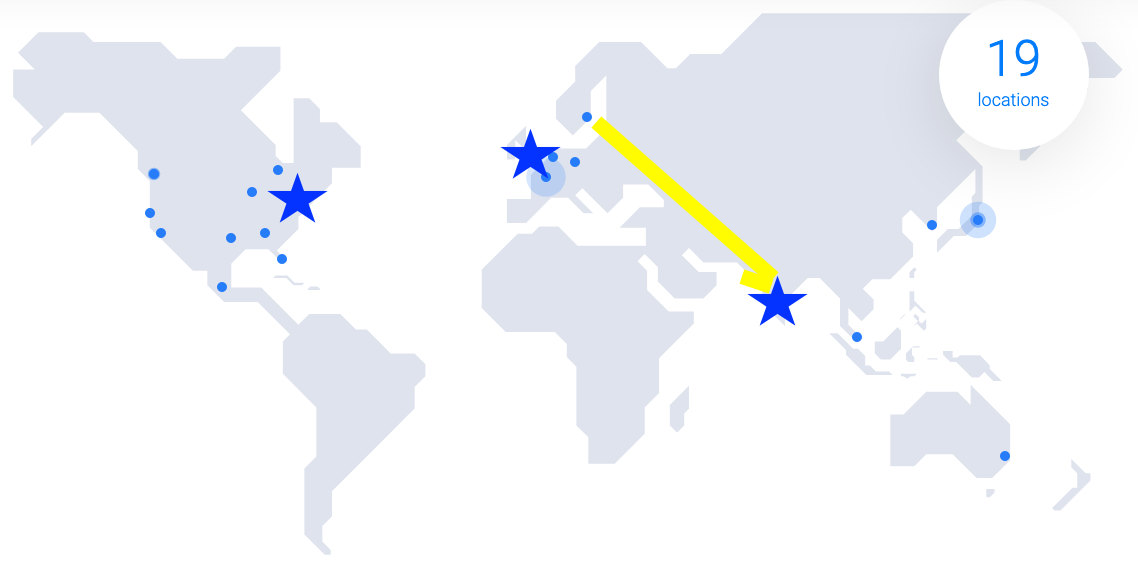
Using multiple VPN servers instead
As a work-around for this issue, I created three VPN servers, each close to a location of members on our support team: New Jersey, London, and Bangalore. Going back to the example of the support engineer in Mumbai connecting to a customer server located in Stockholm through the VPN server in New Jersey - in this case his connection would only have to make the short trip from Mumbai to Bangalore then up to Stockholm from there, without having to cross the Atlantic Ocean and back.
This is good enough for us so I stopped optimizing once we got this far, but there's an even better way to do it which I'll explain here for completeness.
One drawback to this solution is that the support engineer has to turn on the VPN, connect to the customer server, then turn off the VPN. If he leaves it on, he's sending all of his internet traffic to Bangalore which slows down his usual browsing, and we have to pay for that bandwidth on the VPN server as well.
Why no split-tunnel?
Ideally we'd be able to split-tunnel such that he could leave the VPN on at all times, and only requests to *.hostifi.com are sent over the VPN while the rest of his traffic goes out his local internet connection, but unfortunately that's not possible with Tailscale. All internet traffic must be sent to the exit node when connected to it.
Well we're totally doing this wrong but
Some people reading this who know about the technology behind Tailscale are probably disgusted right now because I've basically described the problems with traditional VPNs, found the solution (Tailscale), but then ignored all the benefits it has over VPNs and instead used it to hack together a simple VPN solution with none of the Tailscale benefits.
What we should have done instead
There's actually a much better approach than region based VPN servers with split-tunneling, and it's really the whole point of using Tailscale instead of a traditional VPN solution. Here's a brief description of how to properly do what we're trying to do with Tailscale:
With Tailscale it's possible for the support engineer to connect directly to the server in Stockholm, by creating a peer-to-peer connection coordinated by the Tailscale server, which would remove the need for the VPN server entirely.
Let me explain why we didn't do that though...
For that to work, we'd have to install Tailscale clients on all 2,000 customer VPS instances, and come up with an internal DNS mapping scheme that we could use to connect to the Tailscale private IPs of each customer server.
That's the best solution, but as any business owner knows, the benefit and costs always have to be considered. To implement it would be a lot of work - high cost, and only an incremental improvement - low benefit. For that reason, we're sticking with the three VPN server method for now. It works just fine the way it is!
Choosing Tailscale
I wrote a tweet asking for recommendations for solving this problem and received a lot of replies. I ended up looking at ZeroTier, Nebula, and OpenVPN Cloud briefly before deciding on Tailscale. It all came down to user experience.
I wanted to spend about half a day solving this problem and then never think about it again, not weeks fiddling with command line scripts, reading documentation, and then having to keep a self-hosted server updated.
Tailscale made it really easy to get started, within minutes I had two devices connected with one sending traffic out the other.
Configuring Tailscale
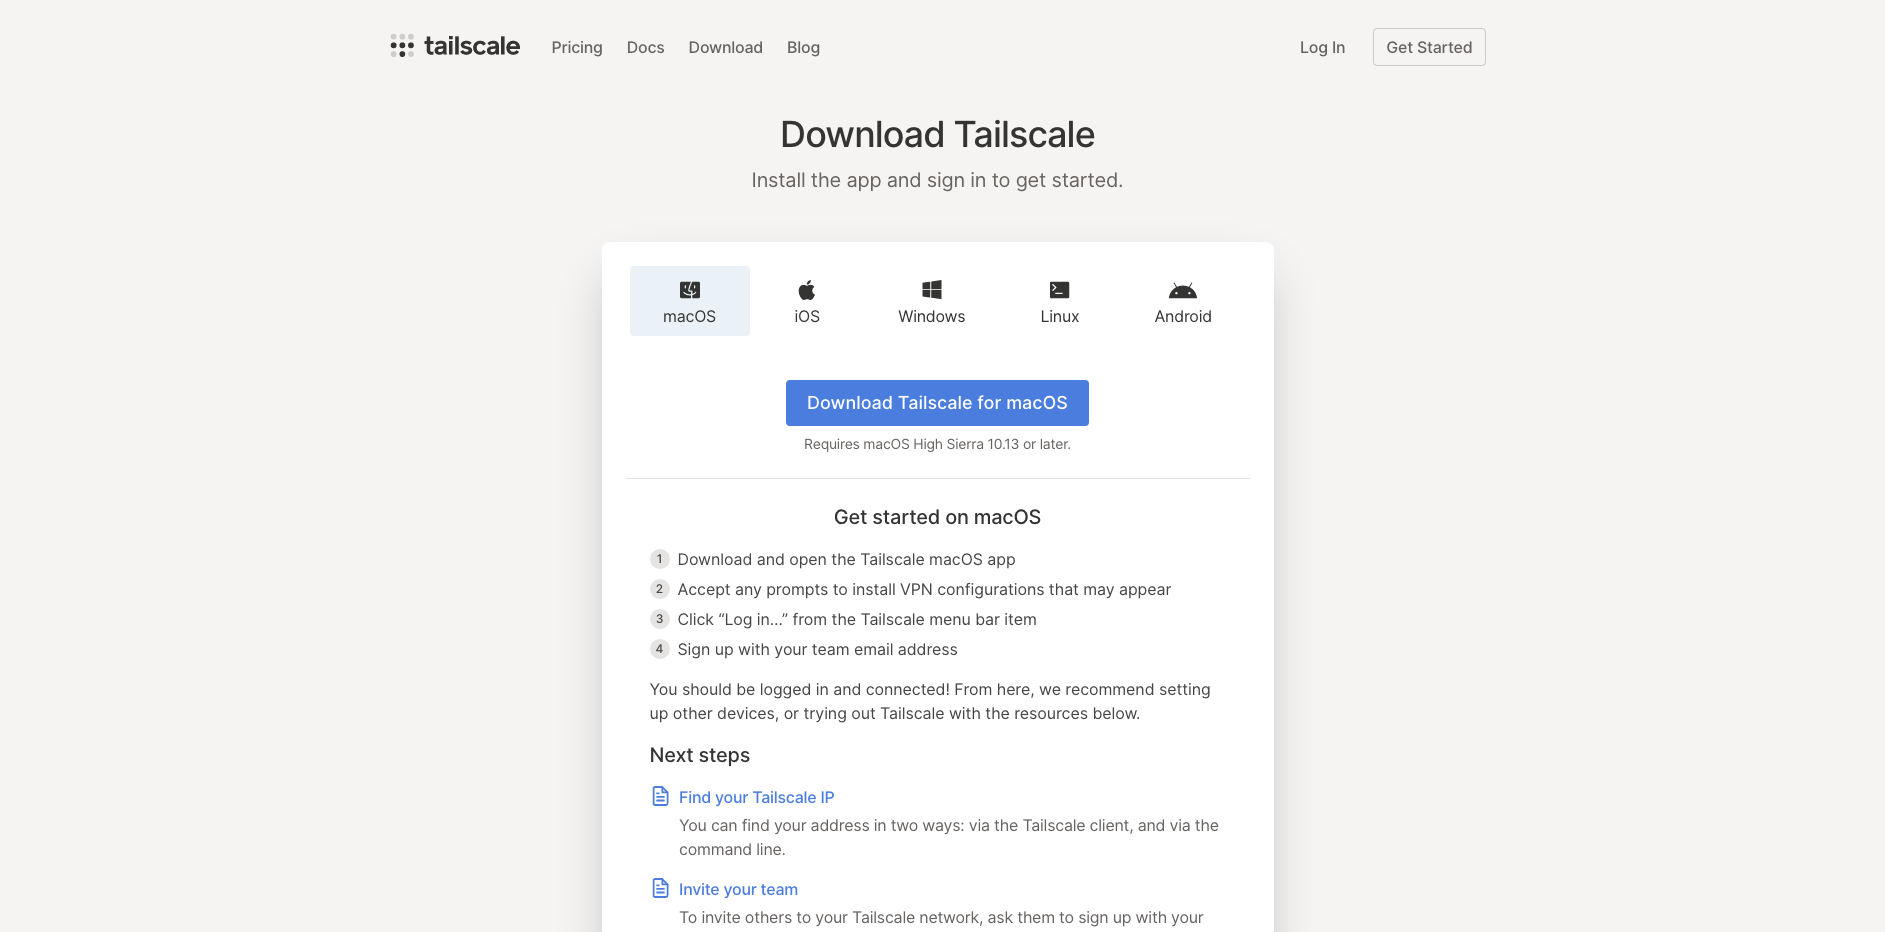
Connecting my MacBook and iPhone
It was very simple to get my MacBook and iPhone connected - simply download the app and log in. We use Google for authentication. I was able to invite everyone on my team to sign up and add their devices too.
Creating and connecting Exit Nodes
Setting up DigitalOcean droplets with floating IPs
The next step was to create the three exit nodes. As mentioned earlier, we need one in New Jersey, one in London, and one in Bangalore to be short hops for our team members in USA, UK, and India.
There are many Linux distros supported by Tailscale that I could have used. I chose Debian 11 for the OS. I used a floating IP for each instance so that way we hopefully will never have to update the customer firewalls with new VPN server IP addresses, even in the event of a hardware failure we'll be able to rebuild the servers with the same IPs.
To install the Tailscale client on each Debian 11 server, I followed the first two steps of the instructions on the download page:

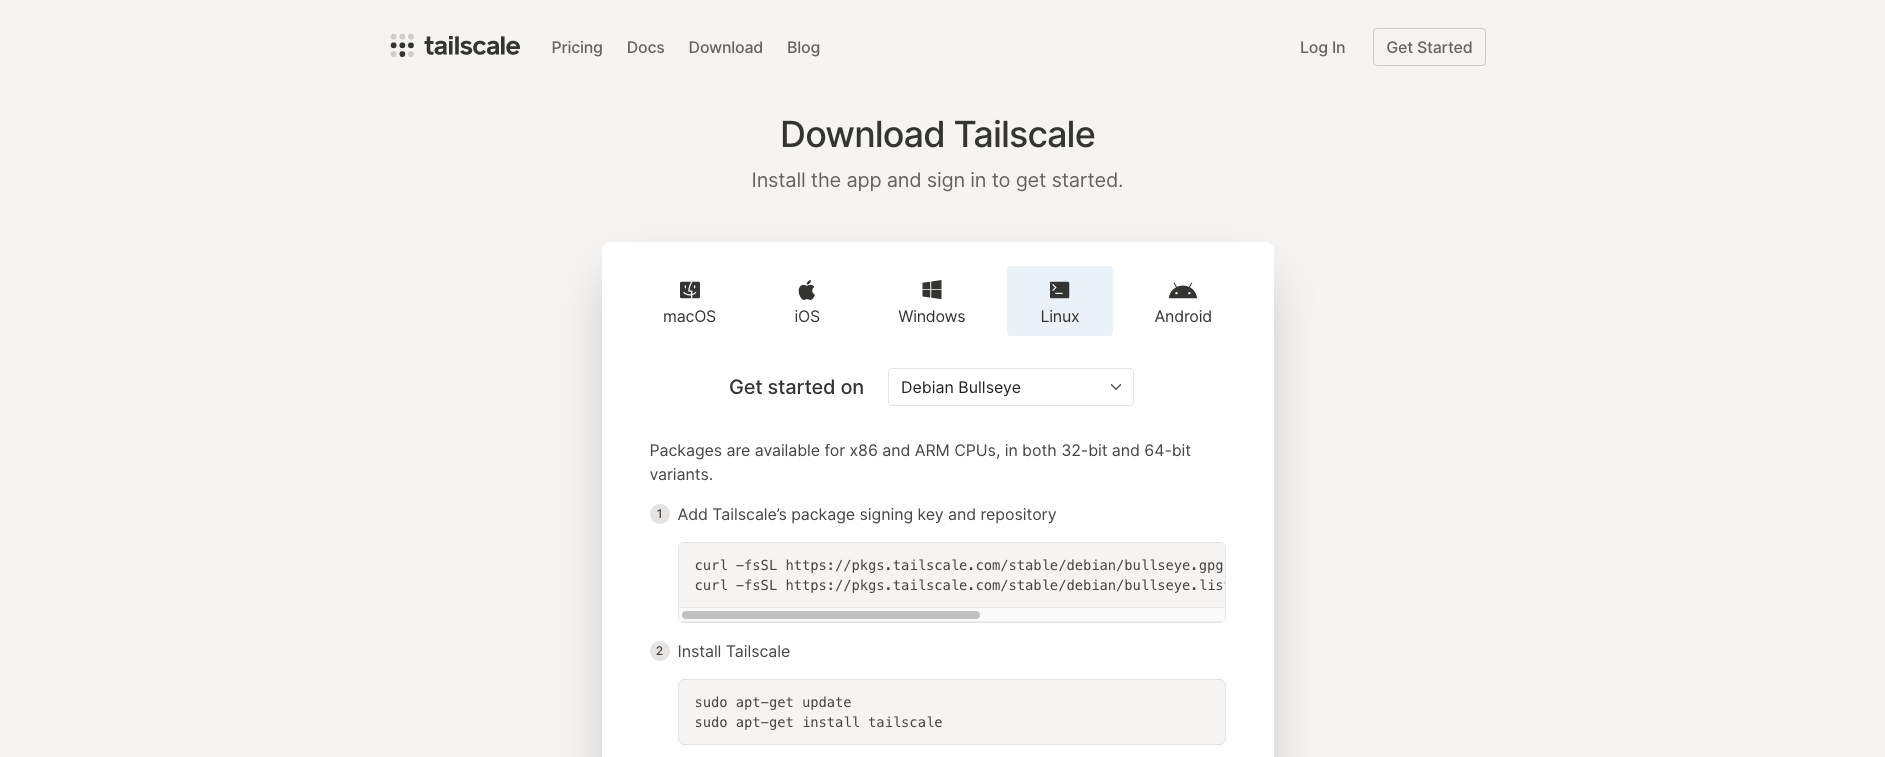
On the third step, instead of
tailscale up
I followed the exit node guide here:
Which uses this command to bring up a new exit node
tailscale up --advertise-exit-node
Configuring droplet outbound traffic to use the floating IP
It turns out floating IPs only work inbound by default, but they can be configured so that outbound traffic comes from the floating IP as well, which is what we needed. There's a guide here on how to fix that:

VM at my house
I wanted to have VPN access to the network at my house, both as an exit node and subnet router, to be able to connect to devices on my LAN or tunnel all my internet traffic home while away.
I created a new Debian 11 VM on my home server and followed the first two steps above on the downloads page to set up the Tailscale client.
On the third step, this time instead of
tailscale up --advertise-exit-node
I used
tailscale up --advertise-exit-node --advertise-routes=192.168.27.0/24
to advertise this server as both an exit node and a route to my home LAN.
Now when connected to Tailscale on my other devices while away from home, I'm able to connect to devices on the 192.168.27.0/24 network directly, split-tunneled, or I can also connect to the exit node there and send all my traffic through it if I want to instead.
Configuring DNS at Tailscale
This was a point of confusion for me during setup. When I first connected to an exit node, internet stopped working. I disconnected and internet was working again. It turns out I needed to configure DNS servers at Tailscale.
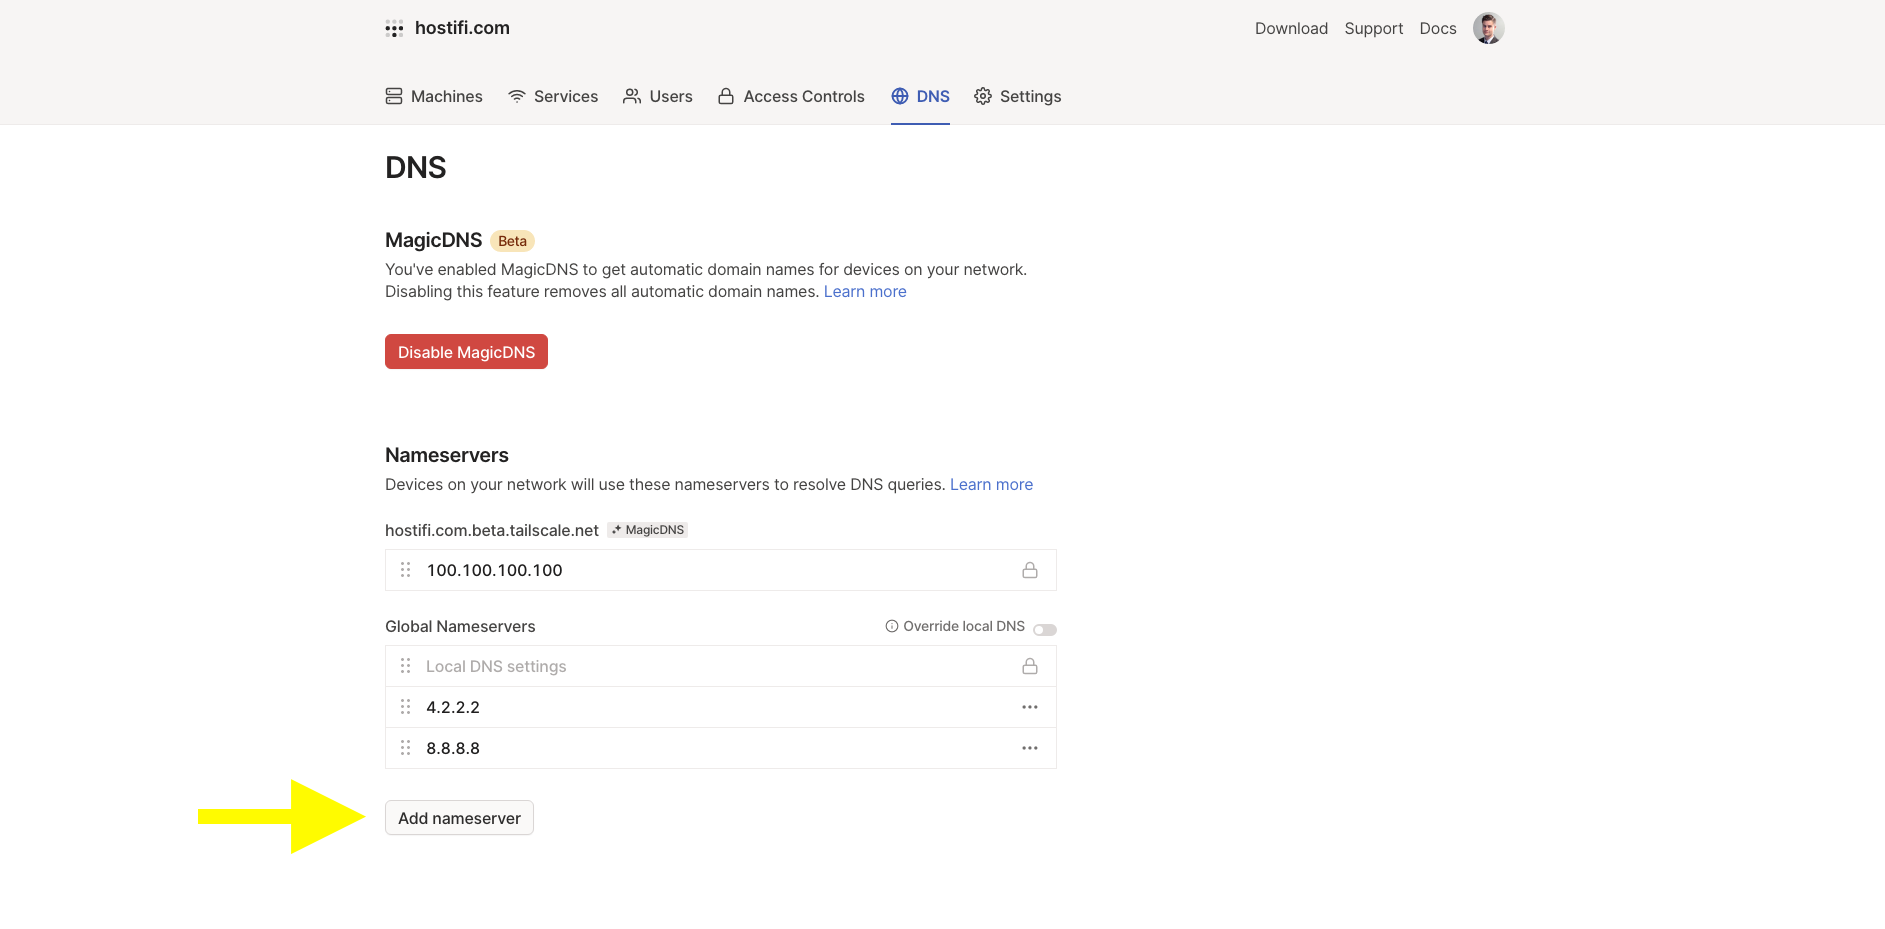
Under the DNS page you can configure Global Nameservers to fix that issue. MagicDNS is not required.
Access Controls
After making it this far, without any access controls configured, access control would look like this
Default permissions
- Everyone on our team who had connected a device to Tailscale could now access everyone else's devices as if they were on the same LAN
- Our team could access every exit node, including my home exit node
- Our team could access every device in my 192.168.27.0/24 LAN
This isn't a big security problem, but I always prefer to take a principle of least privilege approach to security.
Desired permissions
- Everyone on the team can access their own devices but no one else's
- Our team can access every exit node, but only I can access my home exit node
- Only I can access devices on 192.168.27.0/24
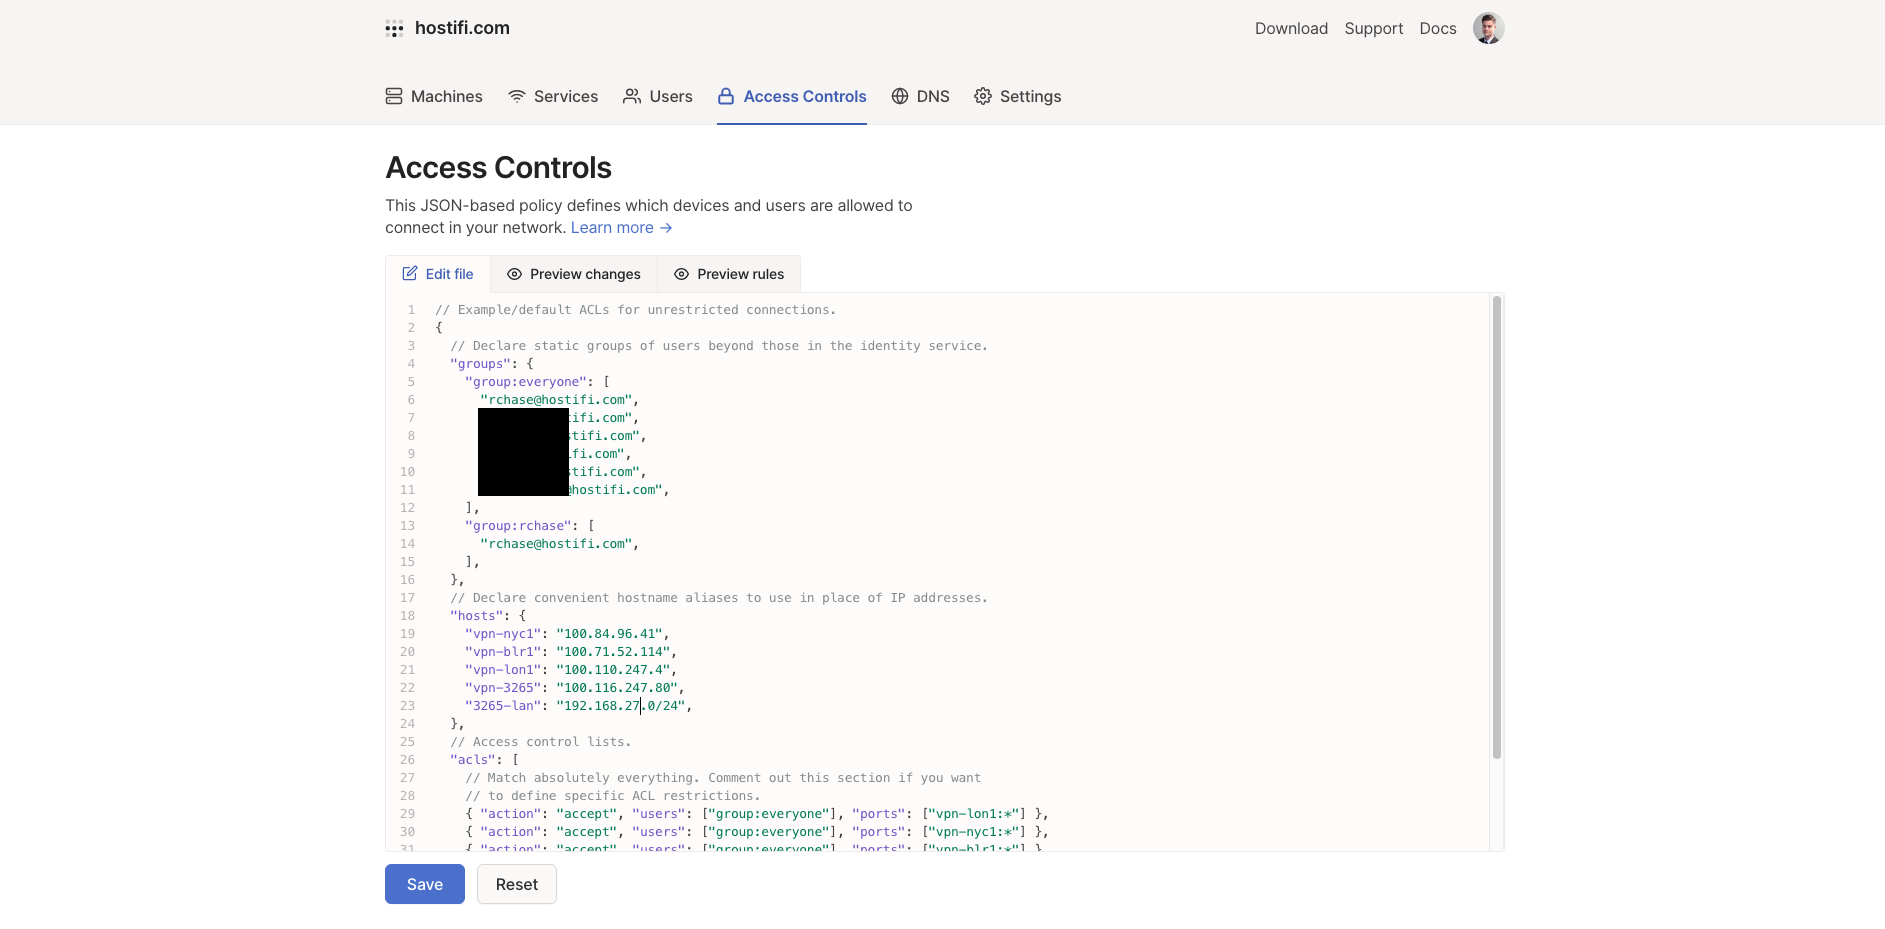
I went over to the Access Controls page to implement this, and was disappointed to see a text editor input with JSON in it:
Up until this point, everything had been so easy. I hadn't had to read very much documentation and I wasn't looking forward to reading API docs to configure this.
It turned out to be pretty painless though, the documentation was easy to understand:
https://tailscale.com/kb/1018/acls/
There were just a couple of issues that had me stuck, but their support team and documentation was helpful in fixing those.
After enabling access control, I could no longer route traffic out the exit nodes
With a quick Google search I found a solution here:
 Trogvar
Adding this rule fixed it
{ "action": "accept", "users": ["group:everyone"], "ports": ["autogroup:internet:*"] },
Couldn't ping devices on the LAN at my house
I needed to create a rule for that too - by default everything is denied unless allowed
{ "action": "accept", "users": ["group:rchase"], "ports": ["3265-lan:*"] },
Full ACL config
Here's the full ACL I wrote, it should be pretty easy to read and rework for your own use case:
{
  // Declare static groups of users beyond those in the identity service.
  "groups": {
    "group:everyone": [
      "rchase@hostifi.com",
      "redacted@hostifi.com",
      "redacted@hostifi.com",
      "redacted@hostifi.com",
      "redacted@hostifi.com",
      "redacted@hostifi.com",
    ],
    "group:rchase": [
      "rchase@hostifi.com",
    ],
  },
  // Declare convenient hostname aliases to use in place of IP addresses.
  "hosts": {
    "vpn-nyc1": "100.84.96.41",
    "vpn-blr1": "100.71.52.114",
    "vpn-lon1": "100.110.247.4",
    "vpn-3265": "100.116.247.80",
    "3265-lan": "192.168.26.0/24",
  },
  // Access control lists.
  "acls": [
    // Match absolutely everything. Comment out this section if you want
    // to define specific ACL restrictions.
    { "action": "accept", "users": ["group:everyone"], "ports": ["vpn-lon1:*"] },
    { "action": "accept", "users": ["group:everyone"], "ports": ["vpn-nyc1:*"] },
    { "action": "accept", "users": ["group:everyone"], "ports": ["vpn-blr1:*"] },
    { "action": "accept", "users": ["group:rchase"], "ports": ["vpn-3265:*"] },
    { "action": "accept", "users": ["group:rchase"], "ports": ["3265-lan:*"] },
    { "action": "accept", "users": ["group:everyone"], "ports": ["autogroup:internet:*"] },
  ],
}```
Tailscale support
It's worth mentioning that I reached out to support@tailscale.com a few times and they were super helpful and quick to reply! Support like that is an important reason why I chose Tailscale instead of using a self-hosted solution.